

Creating content as an online teacher is a rewarding yet time-consuming endeavor. Whether you’re sharing your expertise through YouTube videos, webinars, or workshops, you want to maximize the value of every piece of content you produce. One of the most effective ways to do this is by repurposing your YouTube videos into well-crafted blog posts. This approach not only helps you reach a wider audience but also enhances your SEO, making it easier for potential students to find you online.
In this comprehensive guide, I’ll walk you through the entire process of transforming your YouTube videos into engaging, SEO-friendly blogs using a powerful tool I’ve been loving lately. Along the way, I’ll share tips on editing, formatting, and publishing your blog posts, plus how to leverage these blogs to grow your teaching business.
Why Repurposing Your Content Matters
When you create content, whether it’s a YouTube video or a live workshop, it’s easy to fall into the trap of using that content once and then moving on to the next project. However, this approach wastes valuable effort and limits your reach.
Repurposing content means taking one piece of content and adapting it for multiple uses. For example, you might take a YouTube video and turn it into:
- Short clips for TikTok, Instagram Reels, or LinkedIn
- Detailed blog posts optimized for search engines
- Podcasts or audio versions
- Downloadable resources like PDFs or checklists
By repurposing, you reduce the amount of new content you need to create, saving time and energy. More importantly, it helps you reach different audience segments—some prefer watching videos, others like reading blogs, and some are more active on social media platforms.
One of the most potent forms of repurposing is turning your videos into blogs because blogs improve your website’s SEO, which directly impacts your visibility on Google and other search engines. This means more potential students can find you organically online.
The Power of SEO for Online Teachers
Search Engine Optimization (SEO) might sound technical, but at its core, it’s about making sure your content is discoverable by the people who need it most—your potential students. When you have a well-optimized blog post, it increases the chances that your website will appear in search results when someone searches for topics related to your teaching niche.
For example, if you teach English and create videos about passing specific exams, turning those videos into blogs with relevant keywords, headings, and structured content helps your site show up for queries like “how to pass the English proficiency test.” This not only builds your authority but also drives qualified traffic to your site.
In fact, I ran a blog challenge with other teachers recently, and the results were incredible. One teacher saw her website views skyrocket, and another even had students enroll directly through her site. This isn’t just theory—it’s a tested and proven method for growing your online teaching business.
Introducing the Video to Blog Tool: Your New Best Friend
Now, let’s get into the nitty-gritty of how you can turn your YouTube videos into blogs quickly and easily. I use a tool that has dramatically improved since I first started using it. It’s available on AppSumo, and I’ll share the link later in this post.
To give you an idea of how powerful this tool is, I took a video I did with Jay about setting up Notion for your teaching business and converted it into a blog using two different methods. The tool I’m about to introduce produced a blog that was much better formatted, more engaging, and saved me tons of editing time.
Without further ado, here’s how to use this tool step-by-step.
Step 1: Starting the Blog Creation Process
First, you’ll want to head into the tool’s dashboard. You can create a new blog by clicking the plus sign or “Add your blog” button. The interface is user-friendly and guides you through the entire setup.
Next, you’ll paste the YouTube video URL that you want to convert into a blog. This can be any video you own or have permission to use. If you’ve done live sessions with guests, you can even generate blog content for their channels too, which is a fantastic way to build relationships and add value.
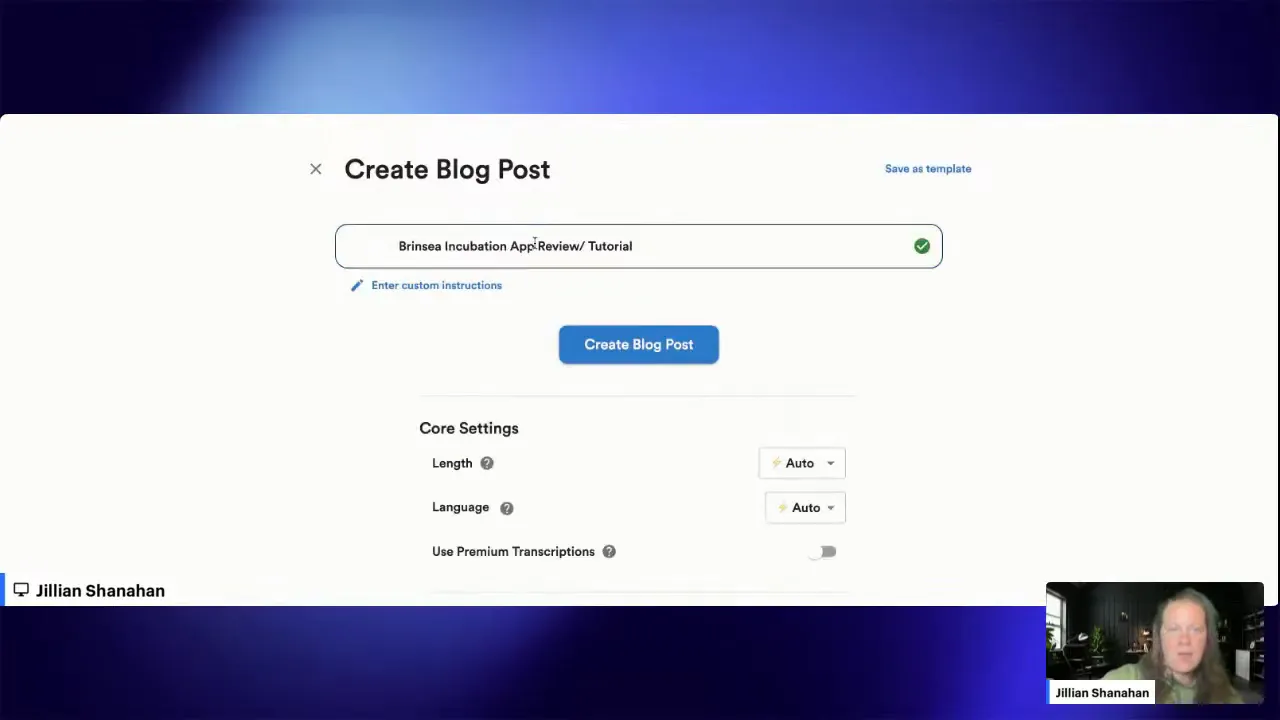
Step 2: Customizing Your Blog Settings
Once you’ve added your video link, the tool lets you customize several settings to tailor the blog to your needs:
- Custom Instructions: If you want the AI to follow specific guidelines or focus on particular points, you can add these instructions here. For example, you might want it to write in a certain style or address a particular audience.
- Length: Choose how long you want the blog to be—short, medium, or long.
- Language: Pick your preferred language. I usually use English.
- Premium Transcription: Selecting this option takes a bit longer but results in higher transcription accuracy, which means better blog quality.
- Speaker Labels: If your video has multiple speakers, you can choose to include speaker labels in the transcription.
- Featured Image: You can generate a new AI image for your blog, use a stock photo, or even reuse the video thumbnail as your blog’s featured image.
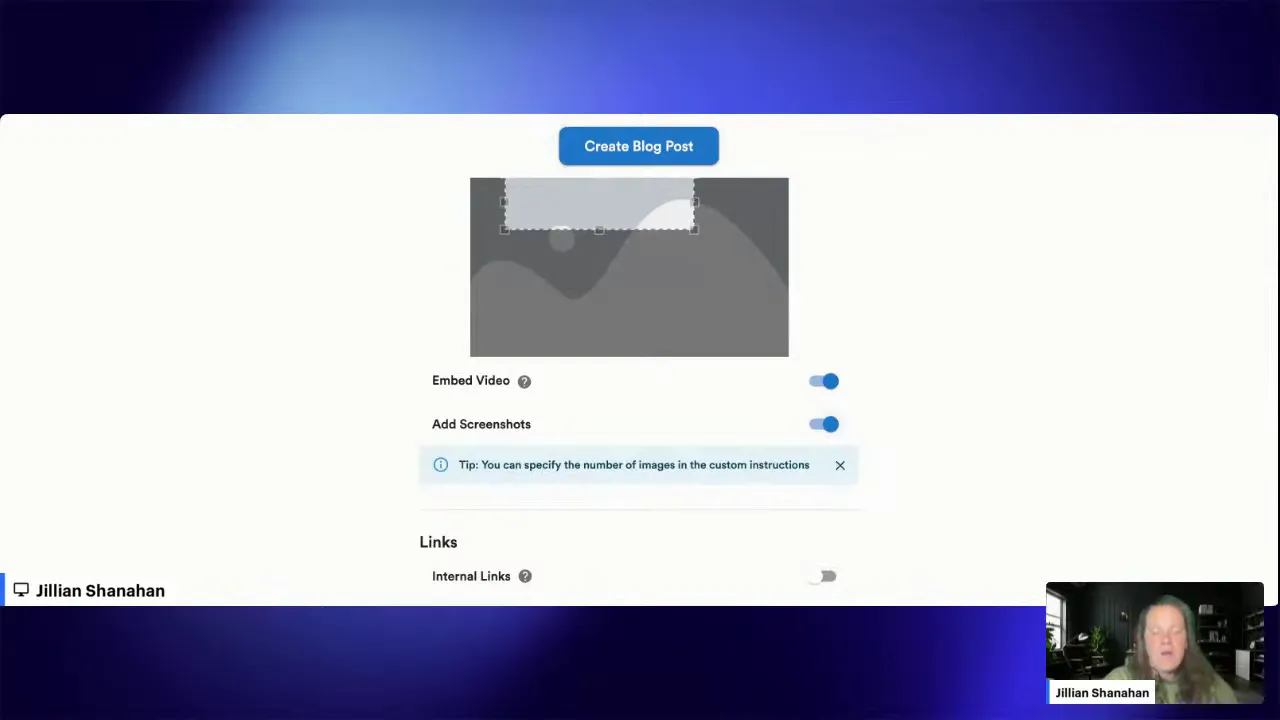
- Embed YouTube Video: You can choose to embed the video directly into your blog post, which is great for engagement.
- Add Screenshots: This feature is a game-changer. The tool automatically pulls screenshots from your video and inserts them into the blog at relevant points. It’s perfect for tutorials or lessons where visuals enhance understanding.
- External Links: Add links from your video description or other sources to boost SEO and provide extra context.
- Writing Style and Tone: One of the coolest features is that you can upload a writing sample to make the blog sound more like you. You can also select the tone—friendly, professional, humorous, etc.—and choose whether to write in the first person. I prefer a friendly, first-person tone without emojis since my audience appreciates straightforward content.
- Blog Format: Choose the format that fits your needs, such as a product review, how-to guide, or listicle.
- Use YouTube Chapters: If your video has chapters, the tool can use them as the blog’s outline, which helps organize the content logically.
- Table of Contents & FAQs: Add a clickable table of contents for easy navigation and include a FAQ section at the bottom to answer common questions.
- Call to Action (CTA): Customize the CTA that appears at the end of your blog, such as inviting readers to join your course, sign up for a newsletter, or follow you on social media.
Step 3: Generating and Reviewing Your Blog
Once you’ve set everything up, click the button to create your blog post. The tool will take a few moments to process the video, transcribe it, and generate a fully formatted blog post complete with images and links.
At this stage, you can review the AI-generated blog. The formatting is impressive, with clear headings, embedded images, and a logical flow that mirrors your video content.
For example, in the blog I created from the Notion tutorial video with Jay, the tool automatically generated a table of contents and inserted screenshots from the video where I was explaining features. This makes the blog much more engaging and easier to follow.
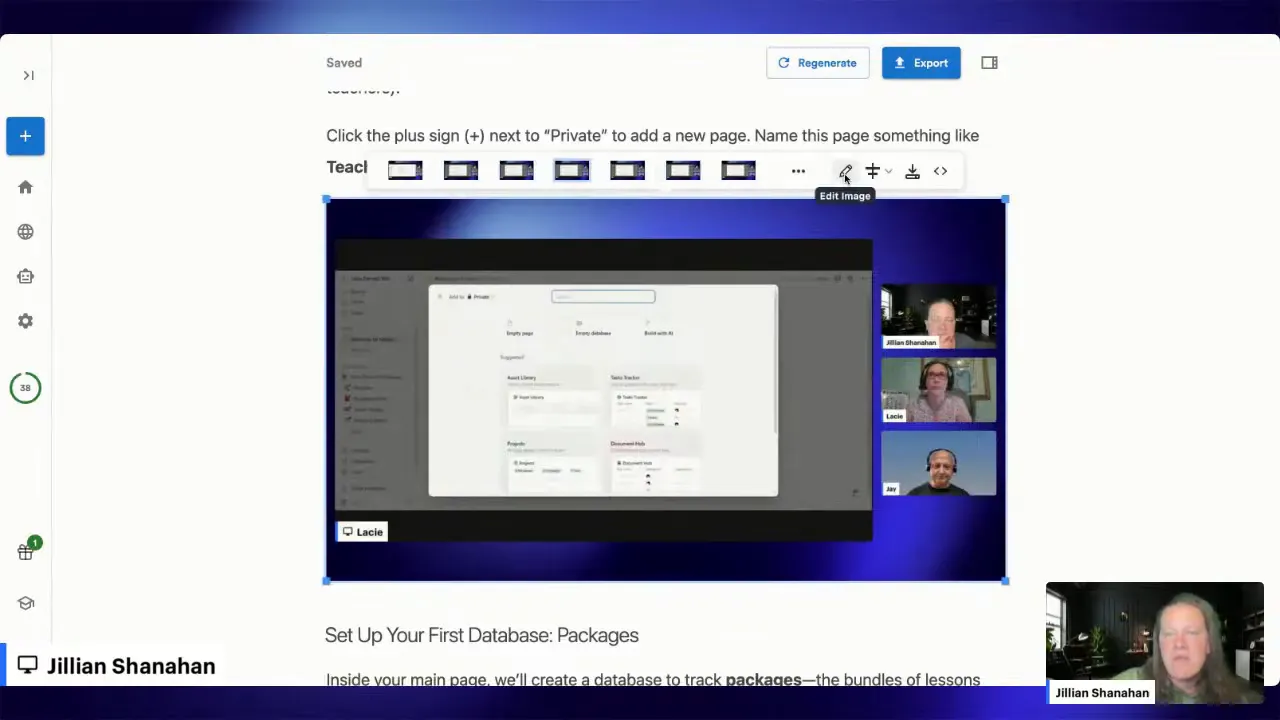
Step 4: Editing Screenshots and Visuals
One of my favorite features is the ability to edit screenshots directly in the tool. You can crop images, remove unwanted parts, add filters, annotate, or create frames to highlight specific areas.
This is especially useful if your video includes sensitive information like student faces or private data. You can crop out those parts to maintain privacy while still showing the relevant content.
For teachers who record webinars, workshops, or trial classes, this screenshot editing can save hours of manual work. You’ll have professional-looking visuals in your blog with minimal effort.

Step 5: Exporting and Publishing Your Blog
When you’re happy with your blog, it’s time to export it. The tool gives you several options:
- HTML
- Plain text
- Markdown
- Direct export to WordPress
I prefer exporting as HTML because it retains all formatting and images perfectly. You simply copy the HTML code and paste it into your WordPress blog post editor.
Once pasted, your entire blog post appears exactly as it was generated, complete with headings, images, and links. You can then add your featured image, tweak SEO settings, and finalize any last-minute edits.
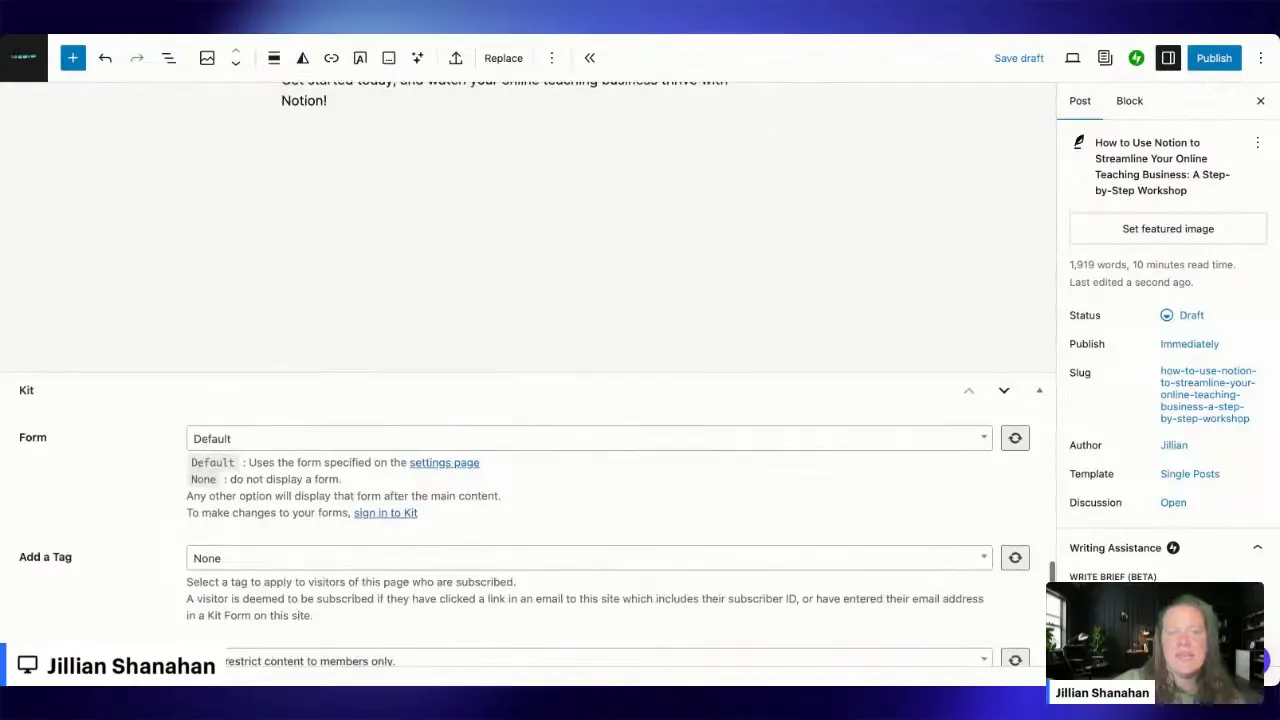
One tip: If your featured image doesn’t automatically show up, you can manually upload it within WordPress to make sure your blog post looks polished and professional.
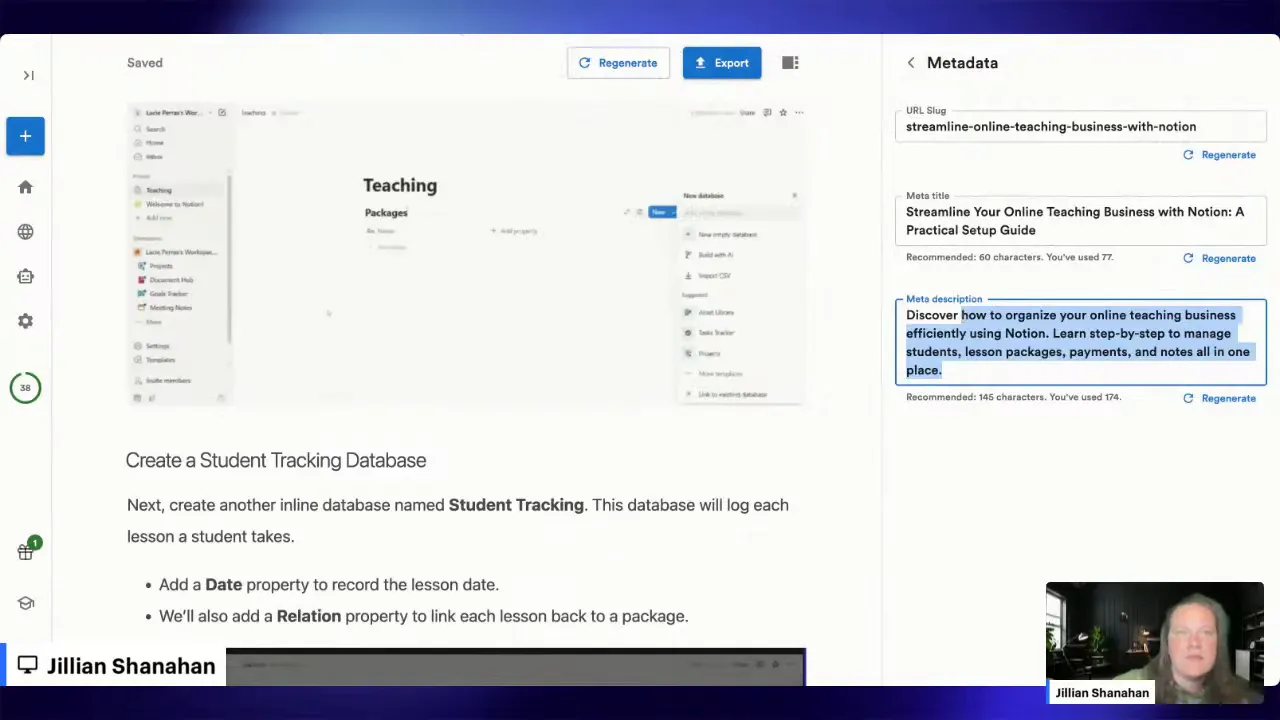
Step 6: Optimizing SEO and Metadata
After publishing your blog content, it’s crucial to optimize your SEO metadata. This includes:
- Meta Title: The title that appears in search engine results. Make it catchy and include your main keyword.
- Meta Description: A brief summary of your blog post that encourages clicks.
- Tags: Add relevant tags to help categorize your content.
- Featured Image for Social Media: Customize how your blog appears when shared on Facebook, Twitter, etc.
Many WordPress SEO plugins, like Yoast or Rank Math, make this process straightforward. Taking the time to do this ensures your blog performs well in search rankings and attracts more visitors.
Step 7: Publish and Promote Your Blog
Once everything looks good, hit publish! Your new blog post is live and ready to attract readers and potential students.
Don’t forget to promote your blog across your social media channels and email lists. Embed the original YouTube video within your blog to keep readers engaged and provide multiple ways for them to consume your content.
Another benefit of having a blog is that you can monetize it through ads like Google AdSense, just like you do on YouTube. This creates an additional revenue stream and helps you earn more from your content.
Choosing the Right License for Your Needs
The tool I’m using is available on AppSumo with different license tiers. I started with the basic tier but quickly realized I was going to use it a lot, so I upgraded to a higher tier to get more blog credits per month.
Each tier gives you a set number of blog generations monthly, with opportunities to earn bonus blogs by engaging with the community—liking, reviewing, or following on social media.
This tool has improved tremendously since it first launched. The quality of the blogs, the accuracy of transcription, and the editing features have all gotten better, making it a worthwhile investment for content creators and online teachers.
Join the Teacher Boss Society Blog Challenge
If you’re ready to dive into blogging but don’t know where to start, I highly recommend joining our Teacher Boss Society July Blog Challenge. It’s designed specifically for online teachers to help you:
- Create your own blogs quickly and effectively
- Learn how to grow your SEO and attract organic traffic
- Build stronger relationships with your audience
- Grow your email list and convert readers into students
Even if you don’t have YouTube videos to repurpose, the challenge will teach you how to create compelling blog content from scratch.
Blogging also helps you answer frequently asked questions once and for all. For example, if students often ask, “How do I prepare for the test?” you can write a detailed blog post answering that question with a call to action inviting readers to take lessons with you. This builds your authority and increases enrollments.
Final Thoughts: Why Blogging is a Game-Changer
Blogging is a powerful, long-term strategy that complements your video content and social media efforts. It’s not just about SEO; it’s about creating a resource that your audience can return to again and again.
The process of turning videos into blogs used to be tedious and time-consuming, but with the right tools, it’s now faster and more efficient than ever. You get professionally formatted blogs complete with images, screenshots, and embedded videos—all without having to write everything from scratch.
If you start using this approach, I’d love to hear your feedback. Feel free to share your experience, questions, or favorite tools in the comments. And if you want to stay updated on future challenges and tips, consider joining our community.
Remember, repurposing your content smartly means less work and more impact. Turn your YouTube videos into blogs and watch your online teaching business grow!
Get Started with the Video to Blog Tool Today
To make the most of turning your YouTube videos into engaging blog posts, I highly recommend checking out the powerful tool I use for this process. It’s available on AppSumo for a limited time, and offers various license tiers to fit your needs. Whether you’re just starting or ready to scale up your content creation, this tool can save you hours of work and help you produce professional-quality blogs quickly.
By investing in this tool, you not only improve your content repurposing workflow but also gain access to features like AI transcription, screenshot editing, and automatic blog formatting—all designed to boost your online teaching business.
Leave a Reply